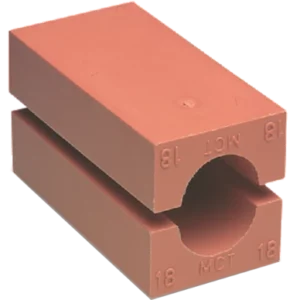
The Multi-Cable Filler Sleeve 12×10 – 10/4 is designed to fill gaps and provide fire resistance in multi-cable transit systems. It ensures a tight and secure seal around cables.
Key Features:
Configuration: 12×10 – 10/4
Fire Resistance: Tested and approved for A-0, H-0, and Jet Fires.
Material: Typically made from high-performance rubber or silicone compounds.
Applications:
Filling gaps in multi-cable transit systems
Fire-resistant sealing of cable penetrations
Suitable for marine and offshore environments
Installation Guide
Preparation:
Surface Cleaning: Ensure the surface of the frame and the surrounding area is clean, dry, and free from dust, grease, and other contaminants.
Inspection: Check all components (frame, multi-cable passage block, and filler sleeves) for any damage or defects before installation.
Frame Installation:
Positioning: Place the frame (60-9806) in the desired location, ensuring it is properly aligned with the wall or floor opening.
Securing: Secure the frame using appropriate fasteners (e.g., bolts or welds) as per the structural requirements and manufacturer’s guidelines.
Multi-Cable Passage Block Installation:
Placement: Insert the Multi MBR 8×15-15/11 block (70-0062) into the frame. Ensure it fits snugly and is properly aligned.
Cable Arrangement: Arrange the cables through the passage block, ensuring they are evenly distributed and not overlapping.
Filler Sleeve Installation:
Filler Sleeve Placement: Insert the Multi-Cable Filler Sleeves (70-0312 and 70-0311) around the cables within the passage block. Ensure a tight fit to prevent any gaps.
For 8×15-15/8 (70-0312): Place these sleeves around the corresponding cables.
For 12×10 – 10/4 (70-0311): Place these sleeves around the corresponding cables.
Sealing: Apply NOFIRNO/CER Sealant around the filler sleeves and cables to ensure a continuous and robust fire barrier. Fill any remaining gaps with the sealant.
Final Inspection:
Verification: Inspect the installation to ensure there are no gaps or voids in the sealant and that all components are securely in place.
Curing: Allow the sealant to cure according to the manufacturer’s instructions. Curing time may vary depending on temperature and humidity conditions.
Safety Precautions:
Wear appropriate personal protective equipment (PPE) such as gloves and safety glasses.
Ensure adequate ventilation during application and curing.
Follow all safety guidelines provided by the manufacturer.
| application | Marine, Off Shore |
|---|---|
| brand | CONTROFIL |
| warranty | Manufacturer Warranty |


Firestop Specialty Equipment and Parts on Demand.
©2024 BUYFIRESTOP.COM. All rights reserved.
Powered by MerakiCRTV